You can find more information on the Visitor variable API from our developer documentation.
There's also an alternative solution, allowing you to connect giosg ID's with your own platform's unique user ID's. Read more here.
You can add customised information about the visitor to the chat via our Visitor variable API. When sending custom data about the visitor through the Visitor variable API, the data will be shown in the left side of the chat window in the giosg console. For example here the property "username" with the value of "John Doe" has been submitted via the API to be shown in the chat window:
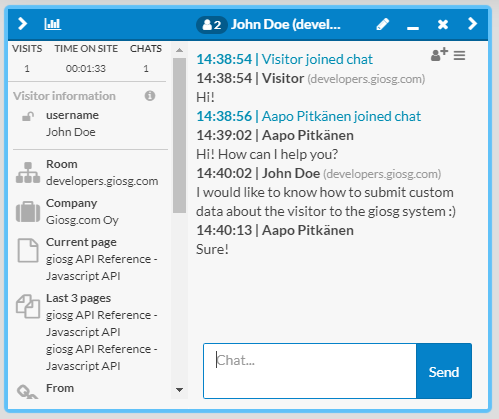
The "username" property is also special in the giosg system, as the value of the "username" property will replace the default name of the visitor. In the example above, before submitting the username the visitor was only named "Visitor" in the giosg system. After submitting the "username" property with the value of "John Doe", the visitor's name becomes "John Doe". This way you can for example send the username property when the visitor logs in to your own system, so you will see their actual name on the chat window instead of the generic "Visitor" name.
The open lock symbol beside the "username" property on the left side means that the data was submitted without any signing algorithm. By default the data is sent as plain text. If you need to ensure that the visitor can't modify the data sent through the API, you will have to sign the sent data. You can sign the data with JWT, for example. You will need an API signing key from the giosg system to succesfully sign the data.
The general Visitor variable API call looks like this:
_giosg('visitor', 'submit', { <property_key>: <property_value> }, <signing_algorithm>, <replace_existing>, <room_information>);
If you want to send the data as plain text without any signing algorithm, you can add 'plain' as the signing algorithm. The <replace_existing> argument accepts a boolean value. If set to true, all future calls will replace all the previous data sent. If set to false, future calls will not replace the existing data, unless the data is sent with the same property key as previously.
The room information argument accepts an array of room objects, with rooms having either the id or the name specified. The id must be in the legacy room id for the room, found in the giosg console's Room settings. Either one of the properties will suffice, you don't have to specify both for the data to be submitted.
Here's an example of the full API call that was used in the screenshot above to send the username data:
_giosg('visitor', 'submit', {username: 'John Doe'}, 'plain', false, [{id: 'spgxcgwpj3qkmfvrxqaafh5wd63js3ir5g3omascvqiqacqm'}])
Using external IDs as an alternative solution
Another option is to use an external visitor ID instead of a key created by giosg, allowing third parties to control visitors' identities in giosg with external id's. This way authenticated users in your own platform will always have the same visitor ID also in giosg too.
The benefits of this are:
- Variables do not need to be cleared or conversations ended on logout.
When the user logs out the external ID is no longer available and therefore, from giosg's perspective, we're looking at a new visitor with no identification data and no conversations.
This means that if another visitor would log in with their own credentials, they get treated as a separate visitor because of their own unique external ID. - If the visitor ID is stored on your server and you use the same ID on every page load after login, conversations can continue across different user login sessions. This means that user can access their conversation from different devices.
Please visit our External visitor identity documentation for more information.