
Use video bots to create informative and engaging content for your customers. Bring your team to your website with Video Bots. Share your story, products, and content in your own voice in your own videos. Create a personal, authentic experience that connects and converts.
This article covers the following topics:
How to start
Different video elements and hosting options
1. Using the Video element (3rd party video)
2. Using the Custom content element
3. Using the Recorded video (Live stream element)
Using Vimeo to store videos
How to start
The easiest way to start building a video bot is to use one of our ready-made video bot templates. Start by creating a new interaction and pick out a template you find suitable for your needs. Think about how the bot should be built: vertical or landscape, how many views and different options you will need.
If there are no templates you would like to use you can always build the bot from scratch. In that case start by creating a new interaction.
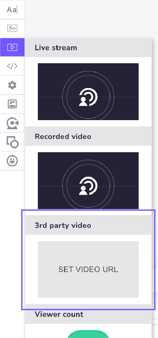
You should also think about where you will be storing the video(s). We recommend you to use Vimeo but other options should be possible as well, for example Youtube. If you don’t have a place to host the videos, there’s also a possibility to store videos in giosg by using the “Recorded video” element which is part of the Live stream player. The Live stream player is an add-on that can be added to your giosg subscription, so if that isn't enabled so if that isn’t enabled for your company contact giosg sales.
Different video elements and hosting options
Using the Video element (3rd party video)
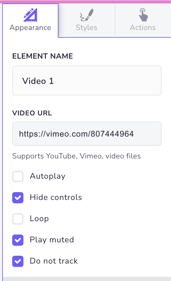
The most important part of the video bot is the video player element. Use this element when you’re using external video links like from Vimeo. Click “3rd party video” drag and drop the element from the left side menu in Interaction Builder. Adjust the size as you wish the video to be. If you’re using a template you have the video element already there.
When clicking the video element it opens the right side Appearance panel. From there you can adjust the settings for your video. Get the link to your video from where it’s being hosted. Paste the link under VIDEO URL. Set the settings underneath as you wish your video to be played.
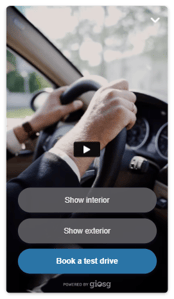
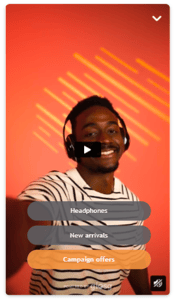
For the first view of the video bot there should always be moving image. You can either use a minimized view for example with a gif (in a button element) or you can have a bigger view with the first video. If you decide to go with the video we recommend to have the settings for the first view video element so:
- Autoplay: on
- Hide controls: on
- Loop: off
- Play muted: on
- Do not track: on
For the next views set the mute to be off, autoplay on and hide controls to be off.
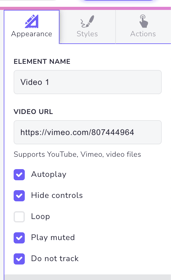
Please note that something that seems exclusive to iOS devices is the restriction of autoplay videos while a device is on 'low power' mode. In order to preserve battery power, iOS devices may restrict the autoplay of video when set to low power. This is why you should have the controls visible in addition when you use autoplay. Minimised views excluded.
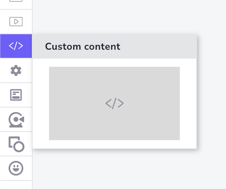
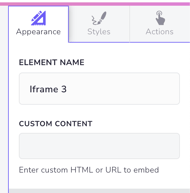
Using the Custom content element
In some cases, for example when using Youtube shorts it is better to use the Custom content element instead of the video element. Drag and drop this element also from the left side menu. This custom content element is an iframe to which you can embed content with an embed link. With this element you have less options inside IB so the visual settings need to be done on the hosting platform side if possible.
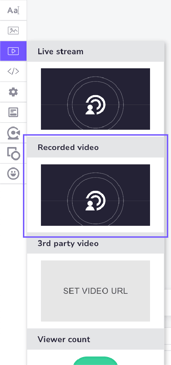
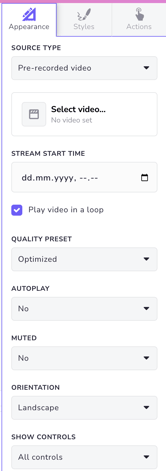
Using the Recorded video (Live stream element)
The third option to create a video bot is to use the “Recorded video” element. Keep in mind that this is an additional feature / an add-on so it might not be available for your company. Drag and drop the live stream element from the left side menu. From the settings on the right side choose “Pre-recorded video” from under SOURCE TYPE. This opens up a “Select video” window. From there you can upload a video straight from your computer.
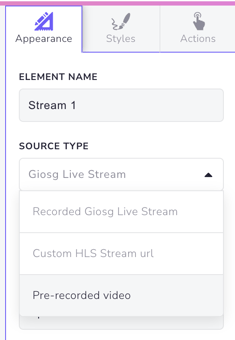
Underneath you can adjust the settings for your video like autoplay, orientation and controls. Remember to test the usability of the video and its controls before publishing it. We recommend you to have autoplay on and video not muted (except for the first view).
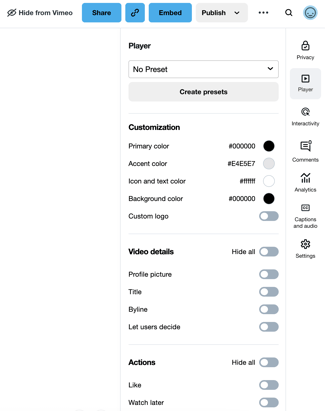
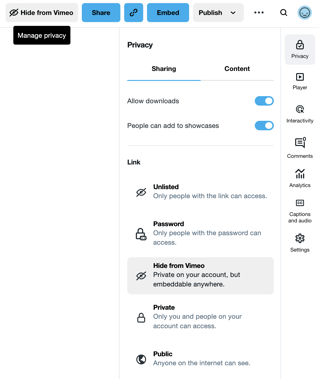
Using Vimeo to store videos
Vimeo has a broad selection of settings to adjust how the video looks when published like colors, logos and profile picture. To adjust them, choose the video you have linked and from the right side menu choose “Player”. Add your brand colors and other settings as you wish.
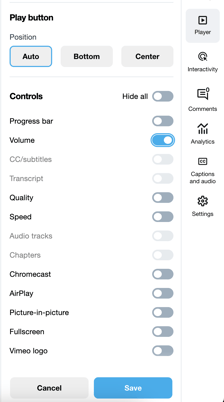
For a clean video bot look without unnecessary controls, you can adjust the visible video control elements in the Vimeo settings. We recommend disabling all controls under Video details, Actions and Controls categories except volume. Check that the settings you have chosen here go together with the ones in Interaction Builder and no controls are overlapping.
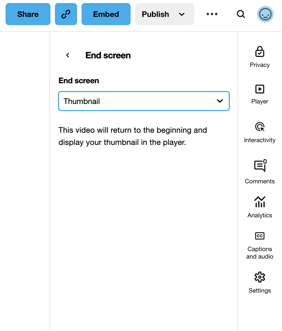
Under Interactivity you can adjust the end screen of the video, when the video isn’t looping. We recommend you to use the “Thumbnail” option.
You can also adjust the Privacy settings of the video from the top bar. If you want the video not to be visible on your Vimeo account but still be embeddable to the interactions you should use the setting “Hide from Vimeo”.
When you’re done designing and building your video bot, proceed to testing and then publishing it. Find more information from the articles below.
Hosting videos in giosg is an additional service. Contact support@giosg.com for more information.